Late last year we started to look into how much energy we were using. The bills seemed high, but it was hard to quantify exactly how much we could save by air sealing and insulating. Our local natural gas utility was offering an energy audit for only $25. The normal price of an audit is closer to $300-$500, so this was quite a bargain. We decided to take the plunge and delve deeper into the efficiency of our home.
Improving the energy efficiency of your home can be a great way to save money. This will be the first post in a series detailing the steps we took to update the energy efficiency of our ranch house built in 1958. For reference, our attic insulation is currently about 6-7″ deep fiberglass, while the recommended level is closer to 18″ for our area – Ohio. The walls are all standard 2×4 construction, with no insulation. No air sealing work had been performed on the house. The windows were all updated with the exception of the basement, which we plan on swapping out later.
I knew there were a lot of areas in our attic that needed some attention when it came to air sealing. There is a great resource over at https://www.energystar.gov that goes into great detail on air sealing. This link takes you to a page with a downloadable air sealing guide. I did a good bit of air sealing on my own before we ever called in an energy auditor. In retrospect, I should have waited for the audit to get a good baseline blower door test on our project.
After some initial air sealing, we decided to call in the energy auditor. He started out taking measurements of the house, looking at our heating and cooling equipment, checking the gas lines, reviewing our energy bills from last year, using an infrared thermal imaging camera, and performing a blower door test. If you have never seen a blower door test before, it is pretty cool. They erect a temporary frame in a door that contains a manometer and a fan. The entire house is put under a slight vacuum. The leakage of the envelope of the house can be determined by how hard the fan has to work to maintain a -50 pascal pressure. This is also known as the CFM50, or the number of cubic feet of air per minute that leak out of the house at -50 pascals of pressure. While the house is under vacuum it is very easy to find leaks. You can feel them with your hand around windows, doors and other leaky areas of the house. The initial blower door number came back at 3250 CFM. Not bad, but I would have hated to see what it would have been before I did my initial air sealing! My guess is closer to 4,000CFM.
After our auditor had finished his assessment, he showed us what our local gas utility, Columbia Gas, was willing to offer in terms of rebates to assist with any insulation we would install. This was a great incentive we were not aware of prior to talking with the auditor. There were 3 recommendations from the auditor that would be covered under the rebate program, wall insulation, attic insulation, and air sealing. There were other things in the home that could be done, like replacing leaky old basement windows and sealing and insulating the band joists (or rim joists), but these were not available for the rebates. These were projects I plan on taking on myself, so I’ll be sure to document these projects here as well.
He walked us through the rebate program and showed us how much the work would cost and how much would be covered by the rebates. The savings were substantial. the price for the work was around $6,000. This was for insulating all our exterior walls with dense pack fiberglass, adding 12″ of fiberglass to the attic and performing 2 hours of air sealing. After all the rebates, our portion of the bill would come to just $2,900. This included an upgrade charge of $700 for going to fiberglass over cellulose. Not bad at all! In addition to all the rebates and energy savings ideas the auditor offered, he also gave us some low flow faucet aerators and LED bulbs. We already had a smart/programable thermostat, but if we needed one there were rebates and free models available as part of the audit.
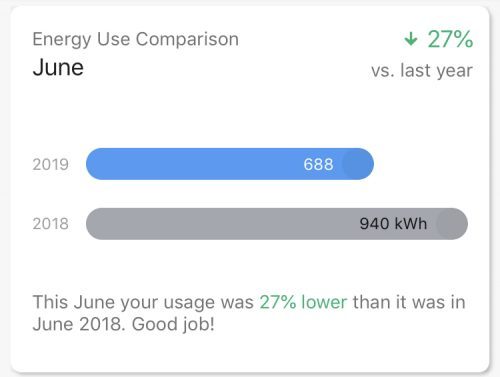
Going forward we will be updating the blog with monthly progress on our energy bill savings. We will track our savings and after a year or so, be able to estimate a payback period for our insulation project. Hopefully other people will be able to use our experience to judge whether insulating their homes would be worth the time and expense. Not to give too much away, but our energy bill is looking significantly lower so far for June. We can track our electrical usage in real time on our “Its My Power App” from AEP. To learn more about this app, check out this article.